Fewer Repairs But More Critical
Tire repairs have been a basic component of a tire dealer’s business ever since the beginning of the tire industry. Car owners could count on making a tire repair on nearly every drive they took in the 1890s because tires weren’t sophisticated. In those days, the repairs were made by the car owner, for the most part.
Today, “flats” are virtually a thing of the past. Manufacturers make tires that are technologically advanced and can withstand most road hazards. The advent of the radial tire, a much sturdier design than the old bias ply tire, reduced the need for repairs and supplied more miles per tire. But these higher tech tires do receive injuries from road hazards such as nails, bolts and other sharp metal objects.

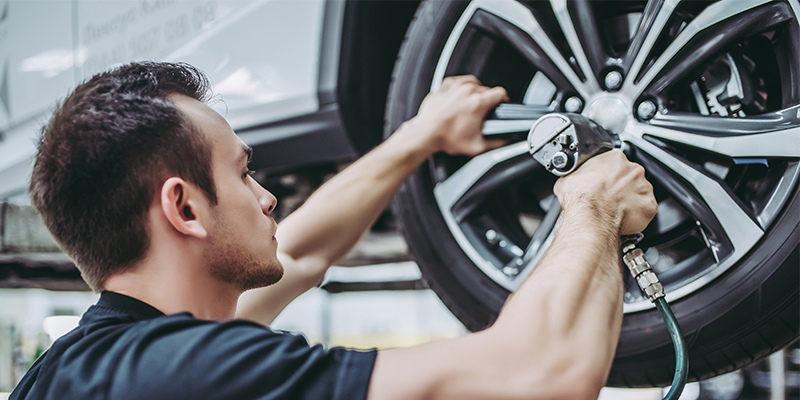
Because of their more sophisticated construction, however, when today’s tires are damaged and must be repaired, the repair can’t be done by the average driver. It can and should be done by a tire service technician who has been trained to do a complete, proper repair.
This article includes sequential photos that show the accepted industry standards of how a tire should be repaired. The repair procedures are for passenger and light truck tires, but are virtually the same for medium truck tires (except for Step 17, as noted). The photos also concentrate on a standard two-piece repair, with one photo showing a one-piece procedure – essentially the same as a two-piece with the one exception.
Getting Started
We recommend that all tires be properly repaired per guidelines by both the RMAand TIA, and demonstrated here. Repairs should be limited to puncture injuries of not more than ¼-inch (6mm). Don’t make repairs where the injury damage extends into the shoulder/belt edge area or where the injury extends at an angle into the shoulder area. If the injury does extend into the shoulder/belt edge, scrap the tire.
Proper tools and repair materials must be used; we have included a list of the basic tools in this article.
Improperly repaired tires can fail while in service, including tread-belt separations and/or detachments. These occurrences may cause an accident resulting in serious personal injury or death.
Remember that not all tires can be repaired. Specific repair limits should be based on recommendations or the repair policy of the tire manufacturer and/or type of tire service – service description, run-flat technology or commercial service applications, for example.
For all tires, repair units can’t overlap. The number of repairs should be limited first by the tire manufacturer’s recommendations and repair policy, then by the application and the tire’s condition as determined by the inspection process.
Some run-flat technology tires can’t be repaired. Technicians should consult tire manufacturers for their repair policies and, if applicable, for their recommended repair procedures.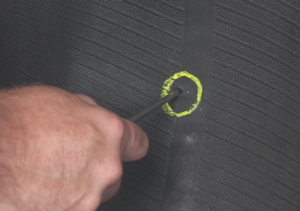
Industry recommended repair methods include:
1. Two-piece plug and patch repair components.
2. One-piece patch/stem combination repair units.
For punctures angled greater than 25 degrees, RMA recommends two-piece plug and patch repair components.
Never Means Never
An old phrase states, “Never say never,” but “never” is alright when repairing tires, according to RMA.
• Never repair tires with a tread puncture larger than ¼-inch (6mm).
• Never repair tires worn to the tire’s treadwear indicators or to 2/32-inch remaining tread depth in any area of the tread.
• Never perform a tire repair without removing the tire from the rim/wheel assembly and completing an internal inspection. Do not perform an outside-in tire repair or on-the-wheel repair; these types of products are not considered full, permanent repairs and should be restricted to temporary use only. It is essential that only a specially-trained person remove any tire from the wheel when it has been damaged or is losing air. A thorough inspection for any internal damage can then be made.
• Never use only a plug (stem) and never use only a patch to repair a puncture. The injury must be completely filled with a suitable vulcanizing material or a rubber plug/stem and a patch must be applied to the innerliner to prevent air loss.
• Never repair a tire that has an existing, improper (non-RMA) repair. The tire must be scrapped.
• Never substitute an inner tube for a proper repair or to remedy an improper repair.
• Never invert radial tires – and avoid excessive spreading of the tire or tire beads.
• Never buff the innerliner too deep, exposing the tire casing body (ply) cords. If this type of damage occurs during buffing, the tire must be scrapped.
For Safety’s Sake
Technicians should be aware of a few warnings communicated by RMA. As pointed out, tires must always be properly repaired as shown in the accompanying section with sequential photos. If improperly repaired, tires may fail in service.
When repairing a tire, adequate eye protection (goggles or face shields) should always be worn to prevent serious eye injuries. Ear protection should also be worn.
Permanent tire damage due to underinflation and/or overloading can’t always be detected. Ply cords damaged by underinflation or overloading may break and cause a “zipper” in the upper sidewall with instantaneous air loss and explosive force. These damaged tires should be inflated only when using a restraining device or safety cage that complies with OSHA regulations and an air line with a clip-on air chuck.
Products from different repair material manufacturers should not be mixed.
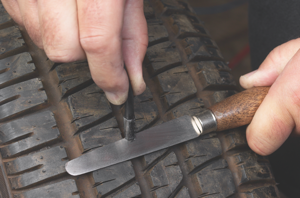
Step-by-Step Tire Puncture Repair Procedures
The following “how to” photos and captions show and explain accepted industry procedures for repairing tire puncture injuries. Additional information is available on RMA’s website – rma.org – and by requesting its Puncture Repair Procedures information, or by requesting information about TIA’s Basic Automotive Tire Service training series, which includes a module dedicated to puncture repair.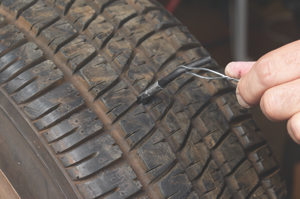
1. Consult information about repairability of tires.
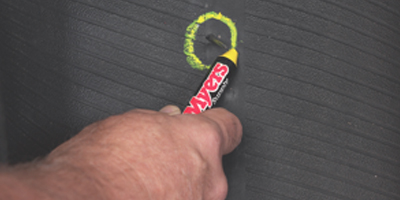
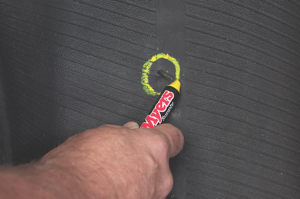
2. Locate the injury and circle with a tire crayon. DO NOT INVERT RADIAL TIRES.
3. Remove the foreign puncturing object and probe the injury with an awl to determine the angle of penetration.
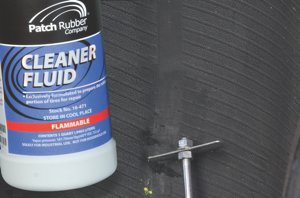
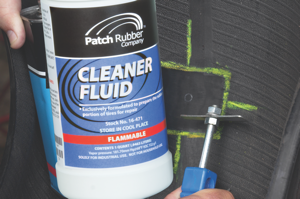
4. Clean the area around the injury with cleaner fluid and a scraper.
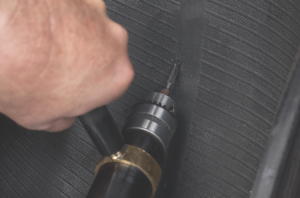
5. Using a low speed drill (max. 500-700 rpm) and a 3/16-inch tapered carbide cutter, ream the injury following the angle of penetration from the inside of the tire. Use proper eye protection.
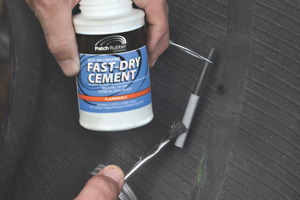
6. Remove the poly from the plug stem. Hook the stem into the wire puller. Coat the entire plug with self-vulcanizing cement. NOTE: With one-piece repair units the patch section must be coated, as well.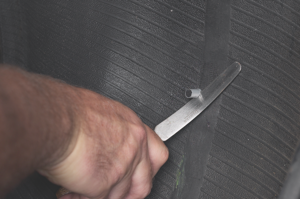
7. While the cement is still wet, push the wire puller through the injury from the inside of the tire. Grasping the wire, use a steady pull until ½-inch of the gray rubber on the plug is exposed outside the tire.
7a. FOR ONE-PIECE REPAIRS: While the cement is still wet, insert the guide wire through the injury from the inside. Using pliers, grasp the stem behind the wire and pull until the patch is seated against the innerliner. Do not over-pull and cause the patch to dimple.
8. Using a flexible knife, cut the plug on the inside of the tire 1/8-inch above the innerliner. Be careful not to stretch the plug when cutting.
9. Making sure the bead arrows of the repair unit are pointing to the beads, center the proper size repair unit over the injury. Use a tire crayon and outline an area ½-inch larger than the repair unit. 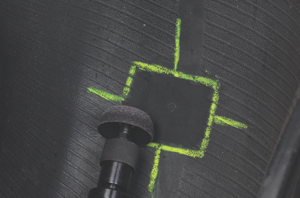
10. Use a low-speed buffer (max. 5,000 rpm) and a buffing rasp to buff the plug and the outlined innerliner area. BE CAREFUL NOT TO BUFF THROUGH THE INNERLINER.
11. Use a vacuum to completely remove the buffing dust.
12. Apply a light coat of cleaner fluid to the buffed area, scrape clean and allow to dry.
13. Apply an even coat of self-vulcanizing cement to the entire buffed area. Allow cement to dry until tacky. Never use blow dryers, compressed air or heat lamps to facilitate drying. Drying time is affected by temperature and humidity.
14. When cement is dry, partially remove the poly backing from the repair unit, leaving just enough to hold the unit. Press the unit into place while removing the rest of the backing.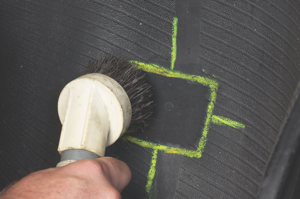
15. Stitch the repair unit vigorously from the center working outwardly. Use as much hand pressure as possible. Remove top cover film.
16. Apply repair sealer on the overbuff area, and over the edge of the repair unit.
17. Apply bead sealer to the bead of the tire before inflation to help prevent air loss around the bead. (NOT NECESSARYFORTRUCK TIRES.)

18. After inflating, cut the plug stem flush with the outside tread area. The tire is now ready to be returned to service.
Click on these links to download a full poster version of this illustrated two-piece tire puncture repair guide, as well as one that details single-piece tire puncture repair procedures.
After downloading, take the PDF file to a local office supply store (OfficeMax, Staples)or FedEx Kinkos location, where you can print out a full-color, 18×24-inch poster to hang in your tire service area and/or customer waiting area.
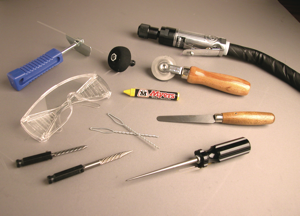
List of Basic Repair Tools:
Awl
White paintstick (truck tire)
Tire Crayon
Scraper
Safety Glasses/Shield
Low-Speed Buffer/Skiver
3/16-inch Carbide Cutter
3/16-inch Adapter
5/16-inch Adapter (truck tire)
Pulling Wires
Knife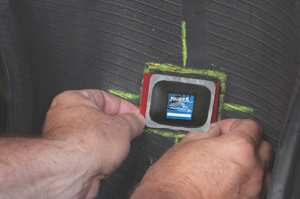
Black Contour Cup – 60 Grit
Adapter with Spacer
Stitcher
When Not to Repair a Tire
• There is 2/32-inch or less of tread on any two adjacent tread grooves. The tire is not legal on U.S. highways.
• The tire cord or steel belt is exposed, there are flex breaks or severe sidewall abrasions.
• There is any evidence of a separation in the tread area or the sidewall of the tire.
• There is any evidence to indicate the tire has been run flat. Do not inflate, since inflation could result in serious injury. Demount the tire and inspect for innerliner damage.
• There are punctures or damage in the shoulder or sidewall areas.
• Never use any wheel with a rim that is bent, pitted from corrosion, cracked or worn. Remove rust, dirt and foreign materials from wheel/rim parts.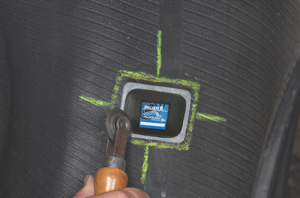
When ‘Always’ is right
• Inflate the tire to maximum allowed pressure. Do not overinflate.
• Check the surface and the valve for the source of the leak(s) by using water, soap solution or leak detector.
• Locate the injury and circle with a crayon.
• Remove the valve core to deflate the tire.
• Demount and inspect the inside of the tire on a well-lighted spreader for innerliner cracks, open splices, exposed tire cord or steel belts, broken beads or bead wires, bulges or blisters, or other interior damage. If any damage other than a ¼-inch maximum puncture injury in the tread is present, do not repair.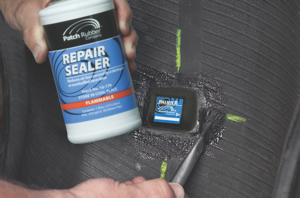
Final Inspection
The final inspection is your last chance to make sure a tire puncture repair job was done properly and within industry standards. A proper repair must completely fill the injury with a suitable vulcanizing material or rubber plug/stem and a patch must be applied to the innerliner to prevent air loss.
Inspect all of your repairs and rework, if necessary. After removing and inflating the tire/wheel assembly, inspect the assembly (tire/wheel/valve) for damage or leakage. Pay particular attention to the location of the repair, the beads and the valve. If the tire continues to lose air, it must be removed again from the wheel for a complete re-inspection.
Radial Section Repair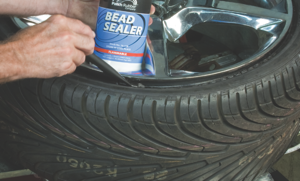
The procedures for repairing a more serious injury on a radial medium truck tire are notably different than when repairing a minor puncture. Section repairs may require special tools and repair materials, including strip gum rubber, an extruder, a spot curing press, specially designed repair units and more.
The process described here is very basic; special training is required to properly perform section repairs.
While the steps for probing an injury angle and buffing are the same, a grinding (skiving)step must be added to remove all damaged wires and the length and width of the damaged area must be measured to assist in selecting the proper repair unit.
For crown repairs, skives should be a cupped “Y” type with a 90-degree skive through the wire belts and ply. Stitching should be done as in a regular repair prior to curing the repair and allowing it to cool.
Next, a cleaner fluid should be applied and the innerliner should be scraped clean. When placing the repair unit over the injury, center it with the bead arrows pointing directly to the beads. Using a tire crayon, outline an area one-inch larger than the repair unit.
Perform the buffing step, vacuum the dust and use a light coat of rubber cleaner fluid and a scraper to clean the buffed area. Apply an even coat of self-vulcanizing cement to the entire buffed area and allow to dry until tacky.
Make sure the tire is in a relaxed position. Partially remove the backing from the repair unit, leaving enough to hold without touching the back. Apply the patch and press down.Then stitch the unit, working out from the center. Use as much hand pressure as possible. As a final step, apply repair sealer to the over buff area and over the edges of the repair unit.
Disclaimer
Repairing a tire is serious business. The preceding article was researched and written using existing industry-approved procedures and material from both the RMA and TIA, and is NOTintended to be used as a substitute for proper tire repair training. The photos and additional information were supplied by Myers Tire Supply/Patch Rubber Co. The process shown here is consistent with those used by other major repair product makers, but consult their specific instructions before using. This information represents a consensus of tire industry experts. This article is meant for educational purposes and those who use the methods recommended are solely responsible for any injuries, deaths or losses resulting from their application.