Last month, we began to walk through the process of putting a true original back on the street with custom wheels and new tires.
To pick up where we left off in May, Larry, the owner of the 1935 Chevy 3-Window coupe, had chosen BFGoodrich KDW II tires with the new tread pattern.
The BFG tires are wider than what Larry had and sport a very contemporary look. Some of my clients favor a traditional tread and look. When I asked Larry how big he wanted to go, his reply was, “As much as you can give me.”
After looking at potential sizes, we settled on 205/50R17s and 285/60R18s.
Now I needed to know the exact dimensions of the wheel required to make these sizes fit. Working on the front, I supported the weight of the car with a block under the lower a-arm, since it was too low to get a jack underneath. I installed a Tire MountMate tool into the 205/50R17 tire to simulate the tire/wheel assembly.
As you can see in the photo, the tire clears sitting static. After we loaded the suspension with someone sitting in the car and by bouncing the front, we determined the fender was going to hit the shoulder of this tire at full right hand turn and under load. I made a note to back off to the 205/45R17 to gain a little more clearance. The tool gave me the backside setting that I needed to make the tire fit without rubbing.
From there, I installed the tool in the 285/60R18 tire and placed it under the rear. This is where I really pushed the limit. To get the rake that I wanted and to fill the fender well with tire, I chose this size because it has an overall diameter of 31.5 inches. My original measurements showed that I had room – barely.
Placing a jack under the rear axle, I lifted the car to remove the old tire and wheel. To stuff this much larger tire into the allotted space, we placed jack stands under the frame just ahead of the rear axle, then lowered the jack under the axle to let it drop back down. I had to turn the tire at an angle to roll it under the fender well, then maneuvered it into position to be bolted to the hub. Once it was bolted to the hub, I adjusted the backside setting to pull the tire out as close to the fender well as possible.
The shoulder of the tire was just inside the fender. I always try to eliminate the gap between the top of the tire and the fender well. Based on the measurements we took, we selected a Centerline Dagger for the look we wanted and the dimensions we needed. The final numbers: 17×7 on the front and 18×9.5 on the rear.
Before mounting a tire on a new wheel, ALWAYS perform a dry fit check. This will verify that the wheel doesn’t interfere with the hub or grease cap. It also allows me to verify that the wheel was built to the dimensions specified.
After this, it’s time to mount some rubber. Once the top bead is seated during the mounting procedure, I bleed all of the air out to allow the tire beads to relax and conform to the wheel bead seat. If you don’t do this, you may notice a high spot that will look like an out-of-round tire. We spun the tire/wheel assemblies up and balanced them dynamically with tape weights behind the face and clip-on weights on the rear flange. The assemblies all spun up well. We bolted on all four corners and moved the car to the alignment rack.
 If you ever want to know how well a car is built, the alignment rack will tell the whole story. In our case, the car wasn’t sitting level at all. I had made some adjustments to the front coil-overs during my original test fit.
Once the car was on a truly level surface, the technician pulled some measurements, then adjusted the spanner nuts to pick the front up so it was level side-to-side. After we were satisfied with the ride height in the front, he leveled the rear of the car, as well. The new readings indicated that the camber was very positive. Just looking at the car, we knew that this wasn’t right.
When you work on something like this, you might as well throw the application guide out the window. This kind of setup takes someone who understands how geometry affects suspension performance. After the camber was set, the toe was brought back in to compensate for the slightly negative camber that was dialed into the setup. The caster was essentially left alone.
We backed the car off the rack and rechecked all of our clearances. The tires cleared at all points, even in the front, since we decided to drop the size to 205/45R17. That decision early on allowed us to put this car together without any major issues.
To determine how much air pressure is needed, rub a chalk line across the tire tread of each tire and drive it for a short period. Stop and look at the wear mark on the chalk. If the middle is worn more, lower the pressure. If the edges show more wear, raise the pressure slightly. You may have to do this several times to get it dialed in to match the weight distribution of the vehicle.
If you have a pyrometer, you can drive a little longer and at highway speeds. Then stop and check the temperature of the tread at both edges and the middle. The temperature needs to be consistent across the tread, but it does not necessarily need to be exactly the same.
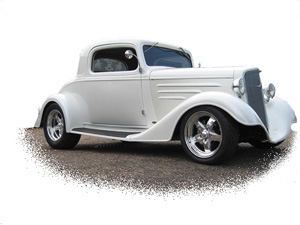
All total, this project consisted of two initial visits, several e-mails and a span of a couple of months. The total price tag came in at $3,100. In the end, what we accomplished was a stunning transformation, as you can see. Take a look at the rear tire after we finished and compare that to the picture of the test fit that we took earlier.
And now for the payoff – the rewarding part of making someone’s dream come true. I ask Larry to bring his car to the store now and then to help with various promotional events. It really helps to show off what our capabilities are and allows others to speak directly to him about the process.
You may be thinking “I never work on cars like that,” but I can tell you that there are plenty of cars and trucks like this within a few miles of most shops. Within two months of this job, we got another call for tires and wheels, the result of a referral from Larry.
I hope you’ve gained some insight into the process needed to accomplish a project like this.
If you have a unique project like this, e-mail me a picture and let me know how it went.