According to Affinia Global Brake and Chassis, memory steer may occur when replacing upper and lower ball joints on a Ford F250, 350 and 450 with a Dana 60 axle.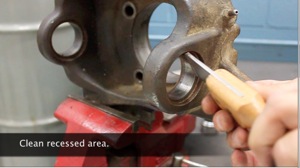
There are three major factors that can lead to memory steer:
• Not removing and cleaning the camber/caster sleeve so it can move freely during the installation
• Improper use of the ball joint press
• Not using the torque wrench properly or following the proper 1-2-3 torque sequence
Fortunately, memory steer can be easily corrected. The repair procedure is as follows:
1. Remove steering knuckle.
2. Remove upper and lower ball joints from knuckle using a ball joint press and adaptors. 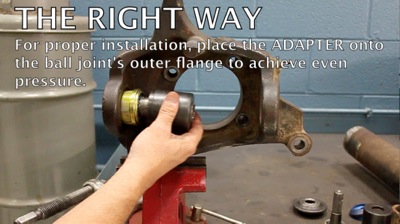
3. Inspect steering knuckle for damage. Clean dirt, rust and burrs from bore and recess, including the recessed area into which the ball joint flange fits. (Figure 1)
4. Place the new ball joint in a vise to articulate stud and rotate; pre-lubricate the joints at this time. Install upper and lower ball joints into the steering knuckle using a ball joint press and adaptors, making sure the adapter fits the outer flange area. (Figure 2)
5. Before installing the knuckle assembly in yoke, index camber/caster adjustment sleeve before removing and cleaning. It is important that the sleeve moves freely in the axle yoke. (Figure 3)
6. Install knuckle assembly into the yoke. (Follow the torque sequence noted below to ensure a proper installation) Torque the lower ball joint. Make sure caster/camber adjustment sleeve moves freely. Torque the upper ball joint. Re-torque the lower joint.
Torque sequence:
1. Lower Ball Joint (35 ft.-lbs.)
2. Upper Ball Joint (70 ft.-lbs.)
3. Lower Ball Joint (190 ft.-lbs.)
A video showing the complete process for correcting memory steer can be found on Affinia’s Raybestos brand YouTube channel.
Courtesy of Affinia Global Brake and Chassis, maker of Raybestos chassis parts. For more information, visit www.affiniagroup.com.