As I prepare to write this article, I can’t help but be struck by the irony of it. No doubt, as a professional technician, you’ve worked around other technicians who are modern day “Pig Pens.”
This is that guy or girl who can’t quite seem to get his or her tools back where they belong. Their service cart is always overflowing; the bench top is covered with a combination of used parts, greasy tools and soda cans. The worst thing about these well-meaning folks is that they spend half their time at work looking for something. You can hear cries across the shop: “I can’t find my @$&%# 1/4” ratchet (or whatever is missing this time)!” 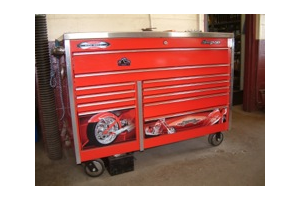
Let me stand up in front of you now and admit: “My name is Mike, and I am a slob in the shop.” I am constantly looking for something as I shove piles of tools, spray cans, you name it, from one side of the bench to the other. I have spent as much time looking for tools in my garage as I have actually worked on my vehicles. This is not a fact that I am proud of, but I would be a terrible hypocrite if I did not confess this right up front.
Having gotten that off my chest, let’s talk about how we might minimize or eliminate the problem of being messy and disorganized in the shop. Much of what I will mention will seem fairly obvious to some; to others hopefully, it will bring eye-opening ways to organize, streamline and be more effective. The reality is that it’s not about being tidy; it’s about making money. The faster and more efficiently you can work, the faster you complete jobs and, ultimately, the more money you make.
So…where to begin? Like all well-built houses, we need a good foundation, and good-sized rooms for many purposes. In this case, that foundation is a well-designed and utilized tool storage system. The “rooms” are the drawers, cabinets, hutches, etc. Notice I didn’t say “toolbox”? Once upon a time if you just had a good upper and lower box, you were good to go. Today’s storage systems offer an expanse of options for you to consider.
My first piece of advice on buying a system continues the house metaphor. Just like the advice you receive when considering your first house, you should buy the biggest system you can comfortably afford. No matter how big a box (or home) you buy, it’s likely you’ll find it won’t be large enough in a few years. While I understand that storage systems are very expensive, it’s better to not have to consider buying a replacement just a few years down the road.
Before you start shopping, take an inventory of the types and amounts of tools you own.
Visualize your “rooms” — what sizes of drawers and types of space do you need to store those tools? — and the tools you may be buying in the near future. As you add more specialty and larger-sized tools to your inventory, it’s essential that you have the storage space to hold them. From drawers and cabinets to hutches and lockers, height, width and length all become critical specifications for you to consider.
Weight is also a factor. All of those heavy tools can warp a cheap drawer. Ask your tool distributor about the gauge of steel the drawers are constructed with. You want to be able to pile in your impact wrenches and drills and lock them up for the weekend without them bottoming out the drawer.
Also look for heavy-duty casters that can handle a large load capacity; compare the drawer capacities and determine if they are full-extension drawers. Additional custom organization components include lift control cabinets, hose reel cabinets, sink cabinets, space for computer monitors and printers, lockers and more.
Also consider the types of jobs you do most. Are you strictly a brakes guy, using the same tools every day or are you working on various systems using many different tools all the time? Is a majority of your time spent on diagnostic work? If so, you’ll need special storage options such as power ports, locking hutch space for monitors, the ability to run cables and underhood lighting.
Do you have a place to recharge all of your cordless tools? Some companies offer specialty drawers or cabinets specifically for keeping all of your power tools at your fingertips. Built-in power access lets batteries recharge while you’re working on other projects. You won’t have to waste any more time trying to untangle cords or move tools around to find the right one, which could translate into time savings and improved productivity.
Do you move about throughout the day or work at a large shop? If so, in addition to your main tool storage system, you’ll need to consider a work cart that offers you some flexibility. Again, check the load capacity and the gauge of steel used. Do the wheels swivel and lock in place? A locking top and drawers are also must-have cart features.
Socket, Wrench & Drawer Organizers
Once you’ve completed building your system, there are many great options to help keep things neat and ready at a moment’s notice. Tool organizers come in many different forms, colors and styles. The choices you make will be based mostly on personal preference. Below are some things to consider when choosing organizers.
One of the most common tool organizers is the magnetic socket holder, which keeps sockets in place. Often socket holders will be designed with magnetic bases, making it easy to secure your tools to any metal surface, including the sides of a toolbox, cart or creeper. Look for products that contain non-transferable magnetic material so they won’t magnetize your tools or damage on-board automotive computers and other automotive-related circuitry.
Socket organizers come in multiple designs — some are actual holders with holes to slip sockets into, while others are flat trays or rails that hold the sockets firmly in place. All of these are great options and it will depend on what you like as to what style you pick. One important consideration, if they are going into a drawer, is to make sure the holders will actually fit in the drawers you want them to. Check the height of your drawer. In some cases you won’t be able to store deep sockets in a holder in your most shallow drawers. Also be sure you can easily read the size label, and look for accessories that are oil and fuel resistant.
Wrench organizers accommodate a wide variety of wrenches and allow for immediate recognition of a missing wrench. Look for those that are made from soft, flexible material that won’t mar the surface of your wrenches. Watch for wrench organizers that display the sizes no matter which way they are turned in the box.
This allows you to place more wrenches in the drawer and still be able to easily spot the one you need. And if you don’t want them in a drawer, look for a wrench organizer that is designed to hang on the side of your toolbox or work tray to provide easy accessibility to your wrenches. And this may sound like a no-brainer, but make sure wrenches are easy to remove from the caddy. The last thing you need to struggle with is getting the wrench out of the organizer!
Drawer organizers are a relatively newer area of toolbox organization. Much like the dividers and organizers used in kitchens for years, you can find some great ways to organize your drawer contents. These can range from simple dividers, to wire racks and also adjustable dividers. The type of divider you choose is up to you, but again, the quicker and easier you can find that certain tool means the sooner you get that car out of your bay!
Organizing doesn’t just end with your tool storage area. You need a lot of other items to do your job that don’t fit inside a toolbox, but need to be safely and conveniently stored. Some problematic items that can cause clutter are ultra-long pry bars, creepers, lifting equipment, hose and cords.
The great news is that there are storage options for many of these problem children. There are several suppliers that make excellent locking storage racks for long-handled tools such as prybars. Most of the dominant creeper manufacturers have toolbox-mounted racks available for their creepers. Hose reels come in many different designs and one of these will fit your needs and your pocket book. I have even seen wall-mount solutions for getting rolling service jacks off the floor.
Speaking of the floor…While not an organizing product, there are some amazing new items to make your life better in terms of comfort while working. Anti-fatigue mat is the official name for floor padding that you can stand on. A couple pieces of this in front of your toolbox will have your feet thanking you at the end of the day.
One final new product that I absolutely love is disposable benchtop oil absorbent material. This product is adhesive on the backside and made of oil and fluid absorbent material on the front. This is the perfect solution for keeping your work area tidy. You can work on this material for days at a time and then when it gets messy, you simply peel it up and throw it away like any other disposable shop wipes. This is especially good for disassembly operations such as engine rebuilders, transmission shops, anything with multiple parts and oil or grease!
So I have given you several product ideas to help you get started in combating and overcoming shop clutter with a solid foundation for a home for your tools. The only thing I haven’t given you is that magic wand to cure your sloppy habits.
Unfortunately, you and I are both on our own to fix that part! But it’s your first step to creating a more organized, more profitable service center.
Easy Way To Keep Your Toolbox Rust-Free
Battle rust-causing moisture with this surprising toolbox addition: charcoal briquettes. These barbecue staples absorb dampness, but briquettes do tend to shed dust, however, so place them in a fabric bag before adding them to your box of tools. Source: MarthaStewart.com
Cleaning, Waxing Tool Storage Units Protects Your Investment
Keeping your tools clean is paramount to maintaining a professional and productive working environment. Without question, you take care of your tools and clean them often because you want them working at their peak efficiency.
You also want your customers to know you are well-organized and uphold clean surroundings while working. And you want to make sure your investment lasts as long as possible. However, how often do you clean your tool storage unit? A tool storage unit may be one of your biggest business assets, but you may not think about keeping it clean to protect that investment.
Like a vehicle, it is important to clean and wax your tool storage unit on a regular basis to protect its finish. What is just as important is using cleaning products that are specifically designed for tool storage units, including cleaners, waxes, polishes and microfiber clothes. You will not only protect the tool storage unit, but you will also help bring back that brand-new shine.
When cleaning the tool storage unit, the first step is to choose a cleaner/degreaser that will remove grease, dirt, oil and fingerprints without damaging the surface of the unit. Make sure the cleaner is water-based and body shop safe.
After the tool storage unit has been thoroughly cleaned, the next step is to wax it to help bring back the shine. By choosing the proper wax, the finish on your tool storage unit will resist water spots, fingerprints and dust. You may also use a liquid polish to safely clean, polish and protect the stainless steel and anodized aluminum on your tool storage unit. It is also important to make sure your wax and polish are water-based and body shop safe.
Another important factor in the cleaning process is choosing a microfiber cloth that doesn’t collect lint and can be used wet or dry. A machine washable cloth is also preferred as it is more durable and provides for a longer life.
Cleaning and maintaining tool storage units should be on the “to do” list of every shop owner or service technician. Using the proper cleaning products is equally important. By caring for a tool storage unit, it will look like new and last longer. Not only will taking care of your tool storage unit extend the life of your investment, it will also show that you take pride in your business and the image you project to your customers. Source: Snap-on
Organizing Test Leads
A post was recently made on iATN (International Automotive Technicians Network, www.iATN.net) asking other techs how they organize all of their test leads. Along with velcro tie straps and women’s hair clips (“claws”), we picked a few of their helpful answers for you.
“I keep boxes of Ziploc bags (snack, quart and gallon). They work great for saving old parts for customers and also for keeping small parts from growing legs. You can also break down your leads and/or adapters into kits.” — Todd Walton, owner/technician, Downtown Auto Repair, Oklahoma City, OK
“I have a plywood shelf mounted to the wall with cup hooks on the underside. It works great and is an excellent visual.” — Roland Chenard, owner, Auto Care, Hopkinton, MA
“Don’t fold ’em, hang ’em,” says Steve McLaughlin, owner/technician of SWM Automotive in Waco, TX. “A long time ago I got away from the bad practice of folding/unfolding leads. Always try to get them into a vertical hanging situation as shown. The blue hangers have slotting large enough to accommodate OBD II cables. The orange ones are for smaller diameter leads.”
“Consider a brake line hanging rack, which should be free from your parts supplier, and will hold several dozen leads. Another option is a wall-mounted serpentine belt finger rack.” — Mickey Slater, owner/technician, Slater Automotive Services, South Bend, IN
“I bought a hundred pack of banana plugs and attached them to aluminum ‘L’ stock. It is great for the test leads. The nice thing is at a quick glance, I can see what is still out on the floor. I can then go looking to see where I left it!” — Patrick Curran, technician, Lee Hall Automotive, Newport News, VA