 Since I began doing part-time mobile diagnostic work for local shops, I’ve noticed that most “diagnostic dilemmas” I’m called upon to solve aren’t really all that complicated. Most of these diagnostic dilemmas were caused by basic oversights and incorrect assumptions on the part of the technician. This situation has largely been caused by a lack of training or, in some cases, poor training.
For example, when on-board diagnostics were popularly introduced in the early 1980s, many early trainers had to fill voids in OEM information by gathering information from anecdotal sources. But, in hindsight, much of the information provided 20 years ago has been proven incorrect. Unfortunately, that now ancient incorrect information and those incorrect assump- tions are still part of our diagnostic dialogue. In most cases, they fall into one of eight categories of common diagnostic mistakes.
1. Skipping the Interview
The single most common mistake of service writers and technicians is assuming that any problem can be diagnosed by simply retrieving a trouble code. For that reason, many service writers and techs fail to determine the actual customer complaint or gather the background information needed to quickly and efficiently address the problem.
To illustrate, last spring I was called to solve a cold-stalling problem on a 2005 Jeep Wrangler. The PCM had stored at least one throttle sensor-related DTC and, following a service bulletin on that particular failure, the shop had removed the driver’s air bag to test the cruise control circuits.
I won’t explore this issue since it became apparent that it wasn’t directly related to the stalling complaint.
But it did momentarily divert my attention away from the immediate problem of the engine cold-stalling until it had warmed up for about one minute. After a short warm-up, the engine started and idled perfectly for the rest of the day. My first impression was a fuel quality problem, but I set that theory aside for the moment because fuel quality hasn’t been a problem in my community during the past eight years.
The next day, the engine started and idled perfectly in the shop and performed perfectly during a test drive, which further confounded the diagnosis. But, after sitting in a cold shop over the weekend, the hard starting and cold stalling symptoms dramatically worsened. That bit of information and a full fuel tank provided the necessary clues. Before spending more time chasing this elusive problem, I asked the client shop to get more information from their customer.
The customer revealed that he had filled his Jeep from an above-ground fuel tank with gasoline that was “only a year-and-a-half old.” The Reid vapor pressure of modern gasoline decreases very rapidly once the gasoline is stored in a vented tank and exposed to dramatic temperature changes. Without the necessary evaporative qualities defined by Reid vapor pressure, the gasoline simply wouldn’t vaporize quickly enough to burn in a cold engine. Refilling the tank with fresh fuel solved the hard starting and stalling complaint.
Need I say more about the importance of the customer interview?
2. Ignoring Ohm’s Law
All too often, I arrive at a shop only to hear from the technician making the assumption that circuit integrity is good if it has “voltage” or “continuity.” While circuit voltage and continuity testing is an integral part of any circuit test, it ignores the basic interaction between voltage, amperage and resistance as stated in Ohm’s Law.
If you’re not using an inductive amp-clamp, it’s time to make that investment for this reason: while a single strand of a 14-gauge copper wire will pass any voltage and continuity test, it won’t transmit the 5+ amperes of current needed, for example, to operate an electric fuel pump. Since this space won’t permit a thorough application of Ohm’s Law, it helps to keep a simple reminder of Ohm’s Law on your toolbox so you can quickly do the math that establishes the correct relationship between volts, amps and ohms. See Photo 1.
3. Relevant Numbers
The diagnostic process becomes far easier when an abstract problem is translated into relevant numbers. To illustrate, I was recently called to diagnose the fuel system on a 1985 Ford F-250 equipped with the 460-cubic-inch engine that, according to the complaint, “was starving for fuel.” While a 1985 Ford truck represents obsolete technology, the case illustrates why relevant numbers are important.
This engine is carbureted and is supplied with fuel by an electric pump located in each of its two fuel tanks.
The bypass terminal on the conventional Ford starter relay supplies 12 volts directly to either fuel pump during cranking. The B+ relay terminal supplies amperage to each fuel pump through a 0.75-ohm resistor when the fuel pump relay and the engine oil pressure switch close the circuit. The tech discovered that each fuel pump had 12 volts at the tank and that the pumps were producing about 2 psi of pressure. But, without the amperage and volume components, both of these numbers become irrelevant. See Photo 2.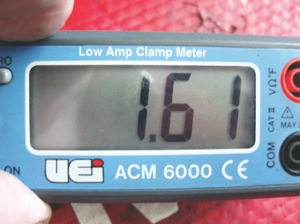
The reason for the low fuel pressure might have been that testing had been done with a partially discharged battery. Here again, Ohm’s Law takes effect because, given the same resistance, low terminal voltage will reduce amperage, which, in turn, reduces fuel pump speed. See Photo 3.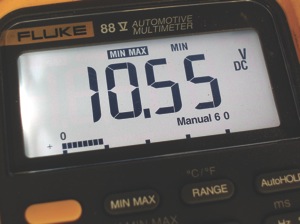
Similarly, a fuel pressure measurement tells us nothing about how much fuel volume the fuel pump is producing. A subsequent volume test proved that either pump delivered nearly a quart in 15 seconds, which is more than adequate. Because both cranking and run circuits are sourced at the starter relay, it was easy to install an inductive ampere probe to determine that each fuel pump drew slightly over 2 amps during cranking and slightly less than 2 amps while running with a fully charged battery.
Now that we had some relevant numbers to work with, it became apparent that we had an intermittent problem at the starter relay. The relay had been replaced without cleaning the B+ connections from the battery and a bad bypass terminal on the new relay caused an intermittent fuel pump failure during cranking. A badly adjusted accelerator pump on the carburetor also caused a lack of fuel on starting and initial acceleration.
Recharging the battery, installing a new relay and adjusting the carburetor accelerator pump solved the lack-of-fuel complaint. While voltage and pressure are key components of any diagnosis, the most relevant numbers were electrical amper- age and fluid volume.
4. Code Dependency
Many technicians make the mistake of using their expensive scan tools solely for retrieving diagnostic trouble codes. While retrieving stored trouble codes is a necessary first step in any electronic diagnosis, trouble codes alone don’t always yield the solution to the problem.
Case in point, I was called to solve a vehicle speed sensor (VSS) trouble code on a 2002 Chevrolet Silverado pickup that had recently had the transmission rebuilt. Since the VSS had been replaced twice without producing a result, I left my shop prepared to diagnose a faulty VSS circuit problem.
Of course, the VSS DTC had been erased to presumably “fix” the problem, which is another common diagnostic mistake. So I began by polling all of the modules for DTCs and verifying that the transfer module was operating correctly. Because the transfer case appeared to be operating correctly, I assumed (dangerous word!) that the transfer case electronics were operating as designed.
Long story short, the VSS trouble code had nothing to do with the real problem. The real problem was that the VSS and three of the transfer case connectors could be easily interchanged. Not only that, since one transfer case wiring circuit has exactly the same color code as the transmission’s VSS circuit, we spent about 30 minutes determining that the VSS connector had been swapped with one of the transfer case output speed sensors. Plugging the connectors into the correct receptacles solved the problem.
In hindsight, road-testing the vehicle would have indicated that the VSS and the front and rear output transfer case shaft speed sensors weren’t delivering a coherent data stream.
Most scan tools offer data stream, voltage graphing, troubleshooter aid and many other features to help in a diagnosis. The lesson learned is that using a scan tool solely for reading trouble codes can lead a diagnostic tech along a very dark and difficult diagnostic path.
5. The Single Failure
All too often, technicians assume that a problem is created by a single failure. While this might be true in new-car dealerships, it’s certainly not the rule in the aftermarket. To illustrate, I was called to diagnose an ignition misfire problem on a 1990 Oldsmobile equipped with the 2.3L Quad Four engine. After start-up, it was apparent that the engine was running on only two of its four cylinders. The tech had assumed that a coil failure on the waste-spark ignition was causing the engine to run on only two cylinders. Swapping out the offending ignition coil didn’t seem to make any difference.
Attaching an inductive amp probe to the B+ wire supplying the ignition module and coils indicated that one of the coils wasn’t drawing a consistent amperage value. Pursuing the matter further, I used an automotive stethoscope to locate a silent number-two fuel injector. A scope and ‘noid light test confirmed that the ECM’s fuel injector driver was operating, but that the fuel injector pintle wasn’t activating. A resistance test indicated the number-two fuel injector had an internal open circuit.
Long story short, the Quad Four had not one, but two problems: one bad coil and one bad fuel injector. Number-one cylinder wasn’t firing and number-two wasn’t receiving adequate fuel. The diagnostic mistake here was stopping with the ignition system failure when, in fact, the engine also had a bad fuel injector.
6. Ignoring Fuel Trims
Many technicians assume that an insufficient fuel delivery problem is always caused by a clogged fuel filter or bad fuel pump. While it’s easy on most vehicles to test fuel pump pressure at the Schrader valve located on the fuel injector rail, keep in mind that some modern vehicles don’t have Schrader valves.
Remember, too, that mechanical pressure and volume testing tends to be irrelevant on modern pulse-modulated electric fuel pumps because the fuel pump speed and pressure is controlled by a pulse-modulated power circuit. Last, fuel control problems can also be created by defective mass air flow, manifold absolute pressure and throttle position sensors. See Photo 4.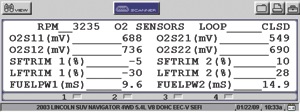
The quickest way to diagnose any fuel delivery or control problem is to observe and record short-term and long-term fuel trim numbers while road-testing the vehicle. In general, most fuel trim numbers are expressed as positive or negative percentages. Remember that, in most applications, the PCM is programmed to achieve a stoichiometric or chemically perfect 14.7:1 air/fuel ratio. A +10% number indicates that the PCM is adding 10% more fuel than originally calculated to achieve a stoichiometric number for the particular driving mode. A -10% indicates that the PCM is subtracting fuel. Many General Motors vehicles use a numerical system in which 128 is considered “zero” fuel trim. Numbers below 128 indicate that the PCM is subtracting fuel while numbers above 128 indicate that the PCM is adding fuel.
A recent mobile diagnostic case involved a “flat spot” on acceleration on a 1996 Chevrolet Tahoe. The tech had verified fuel pump pressure and volume and throttle position sensor output. A cold start produced fuel trim numbers peaking at 160+ at snap throttle, which indicated that the engine was starving for fuel. The snap-throttle test also forced the oxygen sensors to zero voltage.
The flat-spot complaint was caused by the MAF sensor greatly underestimating the air flow into the engine. While much more can be said about using fuel trim numbers to diagnose bad sensors, fuel pumps and vacuum leaks, remember that the scan tool and the short- or long-term fuel trim numbers contained within are your best diagnostic friends.
7. Seeking Sliver Bullets
Inexperienced diagnostic techs often become reliant on “silver bullet” diagnostics because they assume that a specific driveability symptom is always caused by the same failed part. But, while some diagnostic problems do have relatively singular solutions, others require a much more comprehensive testing and evaluation procedure.
Being an old-school type of person, I always begin with what I call a “clean blackboard” approach by not assuming anything when beginning a diagnosis. I don’t rule out any cause based upon its relative probability and I also eliminate what I call the “stupid stuff” by initially testing the battery, polling all modules for DTCs, checking for anomalies in the data stream and other easy testing procedures that will quickly reduce the available diagnostic scenarios.
8. Undone Homework
Before I leave on a diagnostic call, I have to remember to do my homework, which might include researching enabling criteria for the various DTCs, technical service bulletins or anecdotal data that describes the complaint; printing and reviewing wiring schematics and specifications; and selecting the most appropriate testing equipment. In most cases, my fee includes the time spent doing homework.
Because it’s very easy to invest an hour of research time even before the hood is opened on the vehicle, many shops are now billing at least a one-hour minimum diagnostic charge to cover “homework.”
Road-testing should certainly be billed separately because it’s an additional step that’s usually required to verify specific driveability complaints.
Since research time and testing time are the cornerstones of modern diagnostics, it’s important to make money doing it.