Custom wheels can deliver some profitable business, but how can you best deal with TPMS sensors and legal requirements? According to NHTSA, it is against the law to intentionally disable a tire pressure monitoring system, even when switching a customer to custom wheels.
In 2011, TIA reached out to NHTSA regarding scenarios that tire dealers commonly face when servicing TPMS-equipped vehicles, specifically addressing the so-called “make inoper- ative” provisions of NHTSA’s regulations and if they apply to the aftermarket wheels.
In short, NHTSA said “a service provider would violate the ‘make inoperative’ prohibition of 49 USC 30122(b) by installing new tires and wheels that do not have a functioning TPMS. To avoid a ‘make inoperative’ violation, the service provider would need to decline to install the new tires and rims, use the TPMS sensors from the original wheels (if they are compatible), or convince the motorist to purchase new TPMS sensors and ensure that the sensors are properly integrated with the vehicle’s TPMS.”
By law, you can’t disable the system because the customer doesn’t want to pay for your shop to install or transfer the TPMS sensors to the new wheels. In the eyes of NHTSA, neglecting the sensors is like removing an airbag to install a video screen or removing a catalytic converter to achieve more performance.
Most valve stem holes come in a few sizes, with the most common being 0.453-inch and 0.625-inch for snap-in stems. For TPMS valve stems, the size of the hole can be larger for some snap-in and clamp-on holes, but the real problem can be the anatomy of some custom wheels. The valve stem areas may not have the correct size and shape, affecting how a TPMS valve stem seals. Also, some custom wheels can have drop-centers, barrels and flanges that don’t match up with the original wheel or TPMS sensor. But there are some options.
Option 1: Aftermarket Stems and Seals – There are replacement aftermarket valve stems and seals that can seal stock sensors to custom wheels. These can keep the proper orientation and location of the sensor.
Option 2: Banding the Sensor – If it is impossible to fit the sensor in the original valve stem hole, you can attach the sensor with a kit that bands the sensor to the drop center of the wheel. These kits come with a metal band and a mounting tab for the sensor. The sensor is attached to the tab using the stock attachment method. When mounting the sensor, make sure it is mounted flat and in the same orientation as it was on the stock wheel.
Make sure the sensor is attached across from the valve stem. Knowing where the sensor is can prevent damage when mounting the tire.
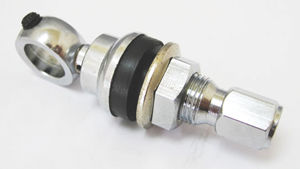
Option 3: Looped Valve Stems – This option allows you to mount the TPMS sensor to a mounting hole on the back of the valve stem. These can work for clamp-on sensors on wide truck wheels.
What Not To Do
Do not epoxy or glue the sensor directly to the drop center of the wheel. Chances are the adhesive will not hold up to the heat generated by the brakes and tires. The sensor will dislodge and bounce around the inside of the wheel.
Do not try to seal the sensors in an airtight container to fool the system. These “TPMS pipe bombs” might work and might not work depending on the type of sensor and relearn procedure. Also, newer sensors have accelerometers that activate the sensor when the wheel is turning to save the battery. Without this type of motion, the sensors may not wake up properly and cause the TPMS light to come on.
Sensor Install Procedures
Clamp-in or snap-in valve stem TPMS sensors are pretty common for customer wheels, and the installation procedure for either is pretty straightforward.
Most TPMS sensors are held in with just a screw or a nut, and if not assembled or torqued properly, there could be serious ramifications. Carelessness can result in a broken sensor or even a customer stranded with a flat tire.
The torque tools required for installing TPMS sensors include:
• Torque wrench that measures torque in inch-pounds
• Preset torque calibrated T10 screwdriver
• Preset valve stem torque tool
Anytime a clamp-on TPMS sensor is reused or replaced on a wheel, it is necessary to install new seals and valve stem nuts to ensure proper sealing around the sensor valve stem.
1. Wipe the area clean around the sensor/valve stem-mounting hole in the wheel. Make sure the surface of the wheel is not damaged, and any pieces of the old seal are removed so they don’t cause a slow leak. Do not lubricate or use a sealant in this area – this can change the torque values and cause you to snap the stem.
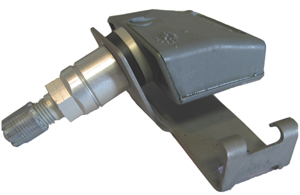
2. If the valve core is removed, it must be replaced with a new valve core in order to avoid galvanic corrosion, which may cause the sensor valve core to fail.
3. Insert the sensor through the wheel valve stem hole, keeping pressure against the rear of the metal valve stem. Mounting the sensor upside down can cause relearn and data transmission problems. Two grommets seal the sensor and nut to the wheel; when the nut is torqued, the seal/grommet starts to take on the shape of the surfaces it is sealing against. If a seal is reused, it could cause a slow leak.
Never reuse nuts. The nut is made of a softer metal than the sensor valve stem, so it will be damaged – and not the sensor – if it is overtightened. If the nut is overtightened, it will develop hairline cracks. The new nut may have coatings on the threads that prevent corrosion and leaks.
Before tightening the sensor nut, push downward on the sensor housing in an attempt to make it fit flush with the interior contour of the wheel. Some clamp-on stems have the ability to change the angle of the sensor by loosening a fastener that holds the sensor on the stem. Other sensors should assume the correct position when the nut is torqued.
4. While holding the sensor in position, tighten the sensor nut with a torque wrench. Typical torque values for the base nuts on a TPMS valve stem range from as low as 35 in.-lbs. of torque to as much as 80 in.-lbs. depending on the sensor. Also, a replacement sensor may have a different torque value than the other sensors. Overtorquing the sensor nut by as little as 12 Nm (106 in.-lbs.) may result in sensor separation from the valve stem.
Leaks will not be eliminated by tightening the nut more. Sealing grommets are engineered to work at a specific torque. Any torque above the specified value will cause the seal to leak. Also, extra force may damage the nut or valve stem or fracture the sensor body.
Snap-in Sensors
Snap-in sensors can look like regular rubber valve stems, but the molded rubber on the snap-in valve stem does not reach the threads and there is a tapered shoulder. These valves have longer caps than non-TPMS valve stems.
Behind the stem is a mounting point for a self-tapping screw that holds the sensor to the stem. There are two installation methods depending on the type of snap-in valve stem you are installing. Always check the instructions or the manufacturer’s recommendation.
The first method is installing the valve stem in the wheel and then attaching the sensor. The second method is to attach the sensor to the valve stem and then insert it into the wheel. Why? On some stems, the sensor could come in contact with the wheel as the stem is pulled with the sensor attached.
When attaching a new valve to the sensor body, always use a preset torque screwdriver with the correct torx head or hex nut. Most tool suppliers package two preset torque drivers in a set. Due to different manufacturers, the torque settings may differ. The screw is self-tapping and can only be used once, and the same also applies to the stem.
When tightening the screw, be mindful of stress on the sensor and the alignment of the sensor. Start the screw for the first couple of threads and make sure the sensor and stem are aligned. When performing the final tightening sequence, stop when the tool clicks indicate that the proper torque has been reached.
Before installing the valve stem, it is acceptable to lubricate the seating surfaces with an approved tire lubricant. Lubricating the stem helps with the alignment of the sensor on the flats.
When using a tire valve stem installation tool, pull the valve stem straight through the valve hole and not at an angle.
Some valve stems have a tab on the body of the valve that can help in the alignment of the sensor.
The rubber bulb of the valve should be resting against the rim and the sensor body should not be touching the rim for most applications.

