ailures are common is because the cylinder head gasket itself can become a wearing part. Since the aluminum cylinder head expands at a slightly higher rate than the cast-iron cylinder block, the cylinder head actually slides a few thousandths of an inch across the gasket surface as the engine warms up to operating temperature.
After thousands of thermal expansion events, the fire rings crimped onto the cylinder head gaskets begin leaking combustion gases into the cooling system. All too often, this combustion gas leakage causes the coolant to be forced out when the engine thermostat is closed. When this happens, combustion gas builds up under the closed thermostat and pushes coolant out of the radiator into the coolant overflow reservoir.
In other instances, coolant will be drawn through the worn cylinder head gasket fire ring and be lost into the exhaust system. The net result in either case will be that the engine runs low on coolant, which will cause a major overheating complaint. See Photo 1.
Analyzing Damage from Overheating
Because the damage seldom stops at the cylinder head gasket, it’s important to assess damage to the engine and cooling system before delivering a repair estimate. In severe cases, a “check engine light” complaint might result because oxygen sensors and catalytic converters become contaminated with coolant. In other cases, the rotating assembly in the engine block can be severely damaged by coolant in the oil. This condition normally requires a complete engine repair or replacement. 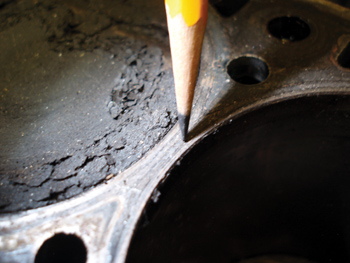
While exceedingly rare on modern engines, combustion detonation will also aggravate head gasket wear problems and will cause a premature gasket failure. Detonation can be caused by a faulty exhaust gas recirculation (EGR) system, bad fuel or over-advanced ignition timing.
The first step in assessing engine condition is to check the engine oil level. If the oil level is overfull and has an opaque, viscous appearance, it is likely contaminated with coolant. If the oil appears darkened and has a burned smell, it’s very likely that the metal overlays on the engine bearings have softened and peeled away.
A severely overheated engine will also usually emit a burned odor from the radiator or coolant reservoir. If the engine has been severely overheated, it’s also likely that sediment from the water jackets has boiled into the coolant stream and deposited in the coolant reservoir or radiator core tubes. If this appears to be the case, the radiator must be cleaned or replaced to ensure against a continued overheating condition.
If the engine starts, but has a clicking noise similar to a valve train problem, the pistons could be scuffed due to lubrication failure or excessive piston expansion. Excessive heat expands conventional pistons at the corners of their skirts, causing a “four-point” scoring pattern easily recognized by experienced engine rebuilders. In contrast, a lubrication failure usually scores a piston at the center of its skirt thrust area.
Cylinder Head Damage
In addition to the indication mentioned above, a sheared timing belt is also indicative of severe cylinder head overheating. As the engine overheats, fore-and-aft cylinder head expansion is limited by the cylinder head bolts screwed into the cast-iron block. The cylinder head then begins to arch upward at the center, seizing the camshaft in its bores and stripping the cogs on the timing belt.
Because an overheated valve can stick in its guide, intake and exhaust valves might also bend in non-interference engines. See Photo 2.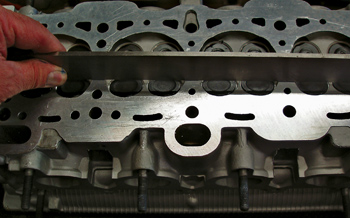
If the cylinder head is warped beyond specification, the cylinder head must be straightened or replaced. In addition, an experienced cylinder head shop will check for cracks in the cylinder heads that are indicative of a severe overheating condition.
Cylinder Head Reconditioning
In my experience, choosing between reconditioning and replacing a cylinder head depends upon the individual application. Some cylinder head castings are so thin that they can’t be reliably repaired. In other applications, a fully equipped cylinder head repair shop can weld cracks and straighten aluminum cylinder heads to specification.
A shop should also be able to replace hard valve seats, restore valve guides and resurface cylinder heads to OEM specifications. Keep in mind that rough mill cuts will quickly ruin most modern cylinder head gaskets.
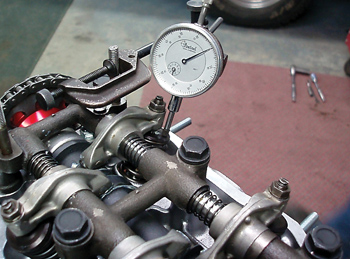
In contrast, late-model cylinder heads require a mirror finish to prevent scuffing the cylinder head gasket during warm-up. See Photo 3.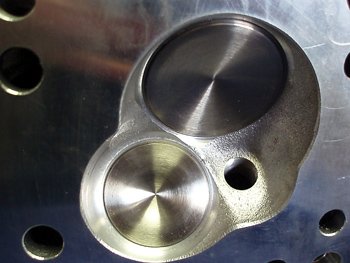
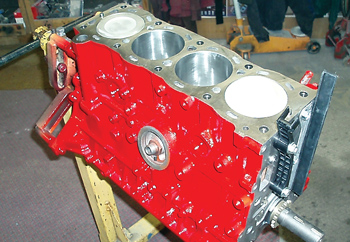
When stock is removed from the cylinder head gasket surface, camshaft timing will be retarded because the center-to-center dimension between camshaft and crankshaft is reduced. In some cases, thicker head gaskets or head gasket shims are available to compensate for stock removal from the cylinder head. If no method of compensating for stock removal is available, the cylinder head should be replaced. On the other hand, many cylinder head shops like to remove a small amount of stock to remove corrosion pitting and wear damage from the head gasket surface. In most cases, the amount of change in camshaft timing is negligible and causes no noticeable change in engine performance. See Photo 4.
Cylinder Head Cleaning
Perfectly clean gasket surfaces on the cylinder head and block are essential to a successful cylinder head gasket replacement. Because gaskets tend to bake onto metal surfaces, gasket removal can be somewhat challenging.
Never use sharp metal instruments that can scratch a gasket surface or use rotating abrasive-fiber pads that can gouge irregularities into precision-machined surfaces. Abrasive pads can also shed abrasive fibers into the engine lubrication system. During cold start-up, high oil pressure often pushes these fibers through the oil filter bypass valve and allows them to embed into soft engine bearings. See Photo 5.
The most preferable method for cleaning aluminum surfaces is using a chemical gasket ¬remover and a plastic scraper available from the paint section of your local hardware store. I’ve also used hardwood clothes pins, as well as brass windshield scrapers, to remove hardened residue from machined aluminum surfaces. In some cases, hardened gaskets can be scraped away with single-edge razor blades, but such a procedure requires care and patience to avoid damaging the cylinder head.
Cylinder Head Gaskets and Bolts
To accommodate cylinder head expansion, modern cylinder head gaskets are usually either of the graphite-composite or the multi-layer steel (MLS) types, neither of which require re-torquing. Because it’s hard to make general statements about modern head gasket installations, it’s extremely important to read the enclosed instructions.
Although some applications do require a dab of sealant on cylinder head bolt threads and at various metal-to-metal joints, many MLS gaskets are already coated with a sealant at the factory. In most cases, applying additional sealants to a new head gasket can cause a loss of bolt torque retention as the engine warms up.
In addition, many modern cylinder heads require torque-to-yield (TTY) bolts that should be replaced with the new head gasket. Because these bolts are stretched beyond their limits of elasticity to achieve maximum clamping force, bolt torque is rated in degrees of rotation rather than by the conventional foot-pound or Newton-meter values. In addition, many new cylinder head bolts are pre-lubed out of the box.
If conventional bolts are being re-used, it’s important to lubricate them according to manufacturer’s instructions or with a light coat of 30w non-detergent motor oil. Oils containing friction modifiers will not provide correct torque values on cylinder head bolts.
Last, it’s important to prevent engine block damage by blowing any liquid residue or debris out of the bolt holes with low-pressure compressed air. The block threads on aluminum engines must also be inspected for pulling, especially if the engine was overheated. Engine block thread repair kits are generally available through OE and aftermarket sources.
Engine Warm-Up
Once assembled, it’s important to bleed air from the cooling system according to recommended procedures.
First, make sure that the engine is filled to its rated capacity with the correct coolant. Next, allow the engine to go through at least one warm-up and cooling cycle to allow additional coolant to be drawn into the cooling system and to check for leaks.
If coolant is circulating through the system, the upper radiator hose and radiator will feel hot to the touch. If the radiator feels cool after the engine reaches operating temperature, air might be trapped under the thermostat. If in doubt, run the engine through another heating and cooling cycle to draw in more coolant.
Last, if the coolant remains at the recommended level in the coolant reservoir, the vehicle is ready to release to the customer.